![]() Blackboard Learn is the primary learning management solution (LMS) for faculty, staff, and students at Mason. As such, it is critical that we remove instructional barriers, ensuring course content is as accessible and usable as possible.
Blackboard Learn is the primary learning management solution (LMS) for faculty, staff, and students at Mason. As such, it is critical that we remove instructional barriers, ensuring course content is as accessible and usable as possible.
For information on how to ensure your Blackboard course is inclusive and accessible, see below:
Blackboard Accessibility Tips
Blackboard Learn is already accessible for many students who use assistive technology applications. In other words, course navigation links can be easily accessed via mouse or keyboard, item and module titles automatically embed some degree course structure that improves navigation for screen readers users, and the list goes on. There are, however, some basic tips and strategies that faculty and staff must employ to ensure their online courses are as accessible as possible for all students.
We have compiled a brief list of usability and accessibility tips/strategies below:
Why is this important?
Many students struggle with navigating a series of course ID numbers as opposed to the actual course names. For students who rely on text-to-speech or screen readers this is especially difficult because each course ID must be read aloud before they identify the appropriate course link.
To change your course name in Blackboard, do the following:
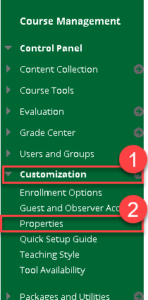
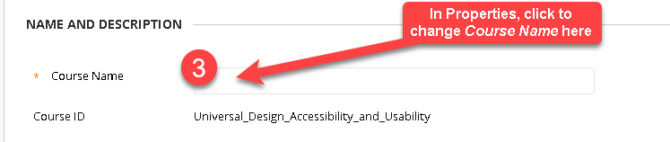
- Open your Blackboard course.
- In the Course Management Control Panel, select Customization.
- Next, select Properties.
- Click in the Course Name field at the top of the page and enter your new course name.
- Click Submit.
Creating a Start Here or Welcome page provides students with clear guidance on how to get started working with your online course.
Why is this important?
This is especially beneficial to students with learning and/or cognitive impairments who may require a more structured approach to navigating an online course.
For additional guidance, review this video on Designing Your Course Entry Point from Blackboard (1:56):
If possible, include a short video introduction acclimating students to the course site and how best to access instructional resources and assignments. While beneficial to all students, this is especially beneficial to non-traditional students who may not have taken an online course before. It also benefits students with learning and/or cognitive challenges who may require a more structured approach to navigating an online course.
All videos should have accurate, synchronized closed captions. All audio content should include a transcript. For videos where the visual imagery is a critical part of the instruction, audio description should be included as well. This is beneficial to students with visual impairments who may not be able to visually follow the video.
Visit our Accessible Multimedia Content page for more information.
Adding a meaningful Name (e.g., Week 1 Assignment) to a content area makes it searchable for screen reader users. This also ensures that it is easily identified by other students in the course.
Why is this important?
Headers provide critical structure in your Blackboard course; chunking content so that students who use screen reading applications can navigate to specific content areas. Blackboard makes this easy! When you create an item or add a new content area, simply provide a name.

ADDITIONAL GUIDANCE FOR HEADERS: Headers should be used in a logical order starting with Header 1 (H1), H2, H3, etc. Headers should not jump from H1 to H3. Headings should be used throughout all Modules. Each Module should follow the same heading setup: H1 – H3, etc.
Table headers allow screen reading applications to associate the data in a table cell with the respective column header.
Why is this important?
Without this information, students with visual impairments who use screen readers lack the necessary contextual information to understand the meaning of the data that is presented.
To add table headers in your Blackboard course, do the following:
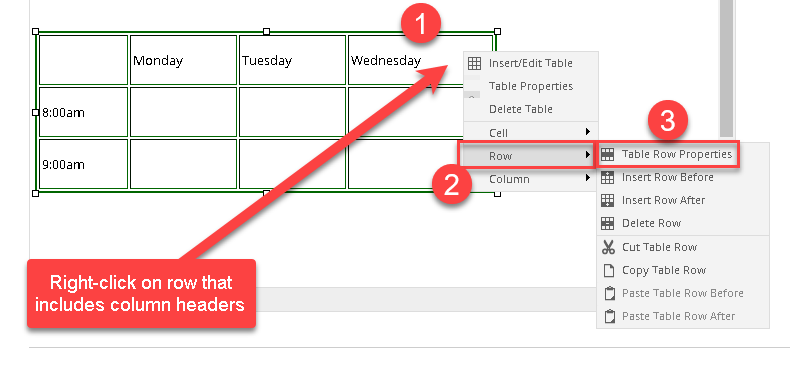
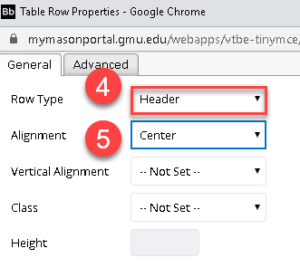
- Right-click on the table row that includes the column headers.
- When the sub-menu opens, select Row.
- Next, select Table Row Properties.
- Under Row Type, select Header.
- Under Alignment, select Center.
- Click Update.
ADDITIONAL GUIDANCE FOR TABLE HEADERS: Make data predictable and easy to navigate. Avoid using merged or split cells and, whenever possible, use simple tables (i.e., one row for column headers and/or one column for row headers.
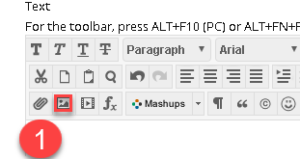
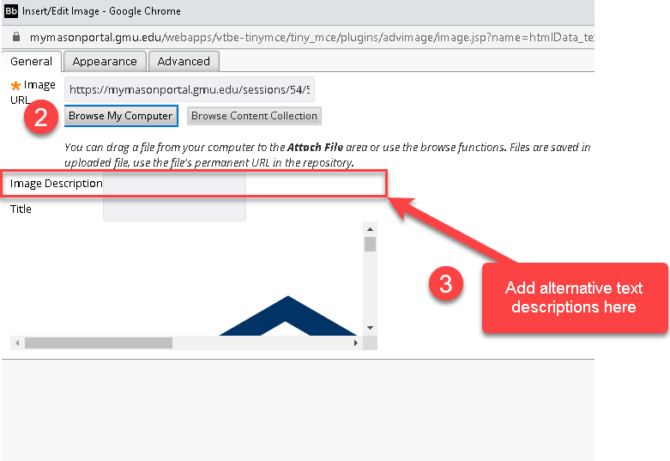
Alternative text descriptions for complex images convey meaningful information to students with visual impairments who use screen readers.
Why is this important?
Screen reading applications do not interpret visual data. For that reason, it is important to provide alternative text descriptions for any content where the visual imagery is critical to understanding its meaning.
In Blackboard, do the following:
First, click the insert image icon in the content editor and then add your alternative text descriptions in the image description field.
 What about decorative images?
Decorative images convey no meaningful information to the end user. They should be marked as such to ensure that screen reading applications skip them when reading through the course site.
To mark an image as decorative in Blackboard, do the following:
- First, repeat the steps listed above. Instead of adding an image description, leave the image description field blank. Click Insert. (PLEASE NOTE: You will be warned about inserting the image without adding an alternative text description. Click OK.)

- Click the HTML icon in the content editor.
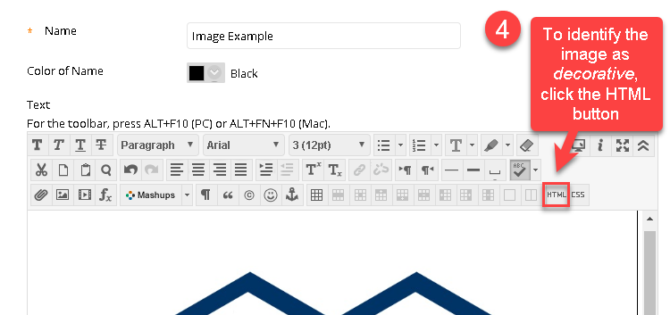
- Once the HTML code view window opens, identify the
tag corresponding to your image.
- Next add alt=”” in the
code. Close the HTML code view window and click the Submit button.

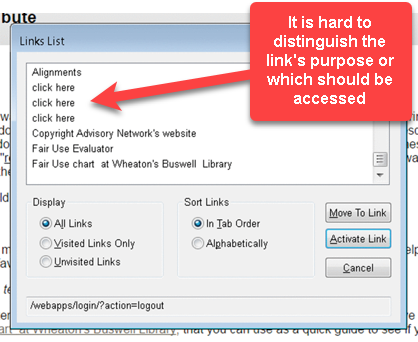
Hyperlinks should inform users where clicking the link will actually take them.
- E.g., Use George Mason University Home Page opens a new window as opposed to http://www.gmu.edu opens a new window.
- E.g., Avoid URLs and non-specific references like “click here” or “read more”
Why is this important?
Screen reading applications allow users to list the links on the page in a separate dialog window. This feature allows a user to quickly scan through all of the links on a web page. Unfortunately, it also strips away the surrounding content leaving the user only with the link text provided.
Good color contrast draws interest to important content on your course site.
Why is this important?
It also benefits individuals who may have colorblindness or those with low vision. The Web Content Accessibility Guidelines (WCAG 1.4.3 opens a new window) states that the contrast ratio for small text (~12 pixels or below) should be at least 4.5:1. For large text (~18 pixels or above) is 3:1.
To check the color contrast in your course site, do the following:
- Download and install Colour Contrast Analyser (by Paciello Group) opens a new window.
- Next, review the YouTube video below from Portland Community College on how to use the Colour Contrast Analyser (1:34):
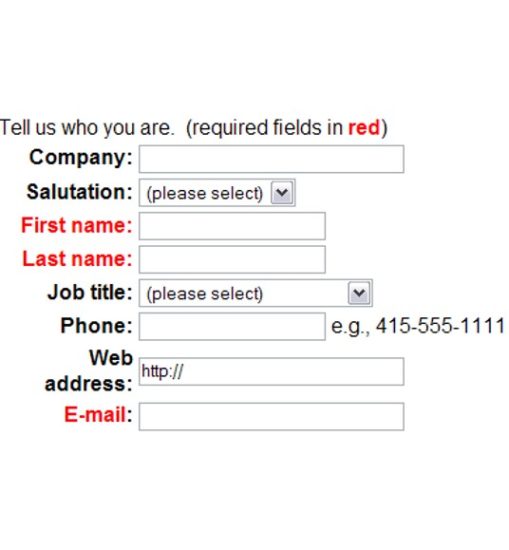
ADDITIONAL GUIDANCE FOR COLOR CONTRAST: Meaningful information should NOT be conveyed by color alone.
- E.g., the image below shows a web form with required fields identified by red text. If an individual is unable to see the color red, they would have difficulty filling out the form. A simple fix would be to add an asterisk(*) next to the required fields. This would then provide users who are unable to see red an additional piece of information to identify what is required.
In the Tools folder, hide unused tools or those that have no relevance in the course.
Why is this important?
Removing unused aspects of the Blackboard course site reduces cognitive load and allows students to focus only on the relevant course content.
To do this in Blackboard, do the following:
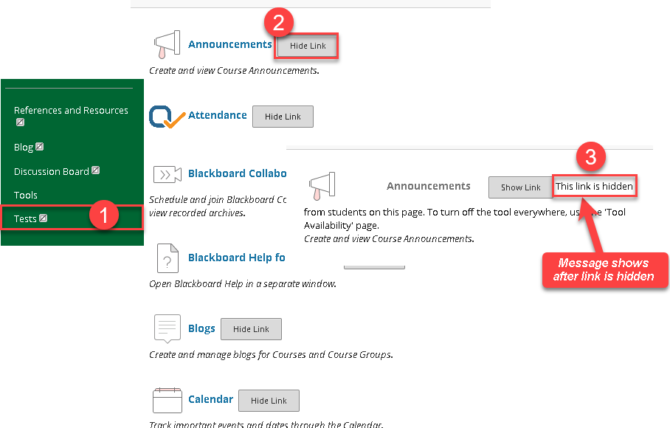
- Click on the Tools menu.
- Identify the link you would like to hide and click the Hide Link button.
- Once the link is hidden, you will see a message stating “This link is hidden“.
- Repeat this steps for all of the links that will not be used in the Tools menu.
Common Testing Accommodations
There are many different factors to consider when ensuring online assessments (i.e., tests, quizzes, etc.) are accessible to all students. We have addressed some of the more common considerations below:
Technology solutions are not necessary for most situations. For example, when appropriate, consider oral examinations in place of written ones. Instead of multiple breaks during an exam, extend the examination to include both breaks and extended time. It is okay to think outside the box. Contact the DS Office if you need guidance.
Keyboard-only users (i.e., individuals with visual and/or motor challenges) may experience cognitive load when attempting to navigate the different question types in Blackboard tests and quizzes. To minimize this issue, group similar question types (e.g., all true/false together, all multiple choice together, all essay questions together, etc.).
Many question types within Blackboard (e.g., multiple choice, short answer, true/false, etc.) require different keystroke combinations in order for a student to answer a question (e.g., space bar for multiple choice, up/down arrows for true/false, etc.). For this reason, it is not uncommon for students to spend more time trying to remember how to navigate through a specific question type then to focus on correctly answering it.
Grouping similar question types reduces the likelihood of this issue, allowing the student to focus on the content as opposed to the method of access.
Use adaptive release to extend the amount of time that a student (or group of students) have to complete assignments.
Why is this important?
One of the most common accommodations provided to students registered with Disability Services is extending time for assignments and/or assessments. The adaptive release feature allows instructors to make accommodations for specific needs in an online format.
To learn how to use this feature, review this YouTube video from Wichita State University’s Instructional Design & Technology Team (2:48) opens a new window:
In general, Lockdown Browser can be accessed by many different types of assistive technology applications. It does, however, create unique challenges for students using speech-to-text software (e.g., Dragon Naturally Speaking) and some students who use screen reading and/or screen magnification software applications.
Supported Assistive Technology
- Compatible screen readers include: JAWS, NVDA, VoiceOver and Narrator.
- Compatible Screen Magnification Applications include: Windows Magnifier, the Zoom feature built into iOS and the Zoom Feature built into the browser itself. Support for ZoomText is limited to enlarging text.
PLEASE NOTE: It is recommended that students launch these applications before starting the test. Additional Information regarding Lockdown Browser Accessibility opens a new window.
If you encounter a problem accessing Lockdown Browser or would like for us to test your particular situation, please contact the ATI or Disability Services for assistance.
Additional Resources for Blackboard
Below, we have listed additional resources to assist with making your Blackboard course site more accessible and usable:
-
- Accessibility Features in Blackboard Learn opens a new window
- Blackboard Help Learn for Instructors opens a new window
- Accessibility Features in Blackboard Collaborate Ultra opens a new window (Video Conferencing)
- ATI Blackboard Course Accessibility Checklist
- In partnership with Mason’s Stearns Center for Teaching and Learning, the ATI reviews both existing online courses and those currently in the development process for digital accessibility. This course accessibility checklist offers guidance on some of the areas that will be reviewed in your online course.
- Using Dragon to take a test in Blackboard opens a new window [PDF]
- Using Dragon to take a test in Blackboard opens a new window [Word]
Still have questions?
If you have additional questions related to Blackboard accessibility, please contact the ATI.