 Ally is an accessibility tool that integrates seamlessly with the Blackboard LMS. It is designed to help institutions build a more inclusive online learning environment and improve access to instructional resources.
Overall, it creates a more engaging and user-friendly experience for students by enabling them to select the alternate formats (e.g., electronic braille, PDFs, audio/MP3, etc.) that best support their specific learning needs. For information on getting started with Blackboard Ally, see below:
Blackboard Ally Basics
Below is a short video overview for instructors who are new to Blackboard Ally (1:28) and some brief tips/strategies to help you with learning what Ally offers and how to access it in your Blackboard course:
Ally does two things:
- Ally identifies images and documents in your Bb course that need to be made accessible for students; especially those with disabilities who use assistive technologies (e.g., blind, low vision, and motor impairments) and those with learning/cognitive challenges (e.g., dyslexia).


- Ally provides all students with the ability to download an alternative format (e.g., audio, electronic braille, web-based, etc.) of any document that you have uploaded in your course.
Ally flags all images and/or documents (i.e., Word, PowerPoint, and PDF) that have been uploaded to your Blackboard course with an Accessibility score.
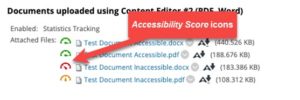
NOTE: Ally has been turned on by default for all Fall 2020 courses. If you do not see Accessibility Score icons to the left of any of your files, it is possible that Ally is not activated in your course.
To make sure Ally is activated in your course, do the following:
- Open your Blackboard Course.
- In the Course Management section, click on Control Panel > Customization > Tool Availability.
- In the Tool Availability table, make sure the Available checkboxes next to Accessibility Report and Ally are checked.
- Click the Submit button.
You should now see the Accessibility Score icons in your course. If you are still having issues, please contact the ATI Office.
The RED, ORANGE, or GREEN Accessibility score icons indicate how accessible your file is and the likelihood that it could pose a potential access issue for a student with a disability.
| Icon Color | Level of Accessibility | Severity Level | Meaning |
|---|---|---|---|
 |
100% | Perfect! | Great job! Perfect! |
 |
67% – 99% | Minor Issues | This file is mostly accessible, but still has minor issues |
 |
34% – 66% | Major Issues | The file is inaccessible! It has issues that would likely cause issues for some students who use assistive technology. |
 |
0% – 33% | Severe Issues | The file is inaccessible! It will be very difficult for students who use assistive technologies to access the content in this file. |
NOTE: RED and ORANGE icons mean that students with disabilities, especially those who use assistive technologies (e.g., blind/low vision, keyboard only users) and/or those with learning/cognitive challenges (e.g., dyslexia), will find it difficult to access the content in those images and documents.
For more information, see Ally Accessibility Score Indicators (PDF).
Simply hover your mouse over the Accessibility score icon to access your score.

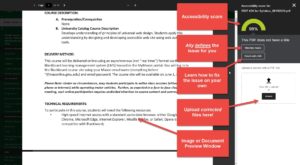
What happens if I click on the Accessibility score icon?
Ally opens an Instructor Feedback window, highlighting the file’s accessibility score, a preview of the issue(s), guidance on how to fix the issue(s), and options for adding alternative text descriptions/marking an image as decorative (i.e., for images only), and/or uploading a corrected version (i.e., for documents only) of a Word, PPT, HTML, or PDF document.
For more information, see Navigating Ally’s Instructor Feedback (PDF).
Currently, Ally checks files in these formats:
- PDF files
- Microsoft® Word files
- Microsoft® PowerPoint® files
- OpenOffice/LibreOffice files
- Uploaded HTML files
- Image files (JPG, JPEG, GIF, PNG, BPM, TIFF)
- WYSIWYG/VTBE content
- The results for WYSIWYG content only appear in the Institutional Report opens a new window and Course accessibility report opens a new window.
Accessibility scores are determined by the severity of issues in each file. A low accessibility score indicates the file has severe or multiple accessibility issues; a high accessibility score means there are minor or no accessibility issues. For accessibility scores less than 100 percent, Ally gives you suggestions for improving the accessibility of the file.
Getting Started with Blackboard Ally
Ally supports the identification of several different types of accessibility issues. Nonetheless, it is suggested instructional faculty began by focusing ONLY on the easiest issues to fix:
-
- Add alternative text descriptions to images uploaded directly to your Blackboard course site
- Add alternative text descriptions to images embedded in your Word and PPT documents
In the following sections, we provide guidance on how to ensure that alternative text descriptions are provided for images uploaded to their course site and/or embedded in their Word or PPT documents:
For Images Uploaded Directly to your Blackboard Course Site
It is very easy to add alternative text descriptions for images embedded in your Blackboard course site using Ally. Use one of the following approaches:
Approach #1: Adding Image Descriptions Using Ally – 3:28
The following video provides guidance on how to add alternative text descriptions for images embedded directly in the course site:
For more information, see Add Alternative Description for Images using Ally [PDF].
Approach #2: Adding Image Descriptions Using Ally’s Course Accessibility Report – 2:44
The following video provides guidance on how to add alternative text descriptions for images using Ally’s Course Accessibility Report:
For Images Embedded in Word and PowerPoint Documents
Ally also detects whether or not the images in your course documents (i.e., Word, PowerPoint, and PDF) have appropriate alternative text descriptions. Unlike images embedded directly in your course site, these images cannot be fixed directly through Ally. The documents must be downloaded and fixed in the native application (i.e., Word, PowerPoint, or Adobe Acrobat).
The following approach should help you with navigating how to add image descriptions for your Word and PowerPoint documents:
Adding Image Descriptions in your Word and PowerPoint Docs Using Ally’s Course Accessibility Report (RECOMMENDED) – 3:57
The following video provides guidance on how to add alternative text descriptions for images in Word and PowerPoint documents:
For more information, see Adding Descriptions to your PowerPoint Images using Ally [PDF].
PLEASE NOTE: While the PDF above only references images in PowerPoint, the same steps apply for images embedded in Word documents.
Additional Questions?
To make PDF documents accessible, which includes adding alternative text descriptions for images, you need a copy of Adobe Acrobat Pro DC. Acrobat Pro DC is available by request through the ITS website opens a new window. If you do not have your own copy of Acrobat Pro DC or are unfamiliar with how to use it for making content accessible, contact the ATI Office for assistance.
See the Submitting your Documents for an Accessibility Review using Ally video below for additional guidance.
Submitting your Documents through using Ally
Ally offers a streamlined way for instructional faculty to get help with making their course documents accessible. BEFORE seeking help with your documents from ATI staff, please do the following:
-
- Word and PowerPoint
- Add alternative text descriptions for all complex images.
- Mark all other images as decorative.
- PDF
- Send as is!
- Word and PowerPoint
Follow the steps below for submitting your documents to the ATI Office using Ally (1:53):
Additional Questions?
Sure! Do the following:
- Go to the ATI’s Request Services Form.
- Enter your contact information.
- Under Mason Affiliation, select Faculty/Staff.
- Under Reason for Request, select Document Accessibility Review.
- Complete the form!
- PLEASE NOTE: You can attach up to 20 separate documents, no more than 8MB per document. For any documents larger than 8MB, please send them via email to [email protected].
Keep in mind that there are no perfect document accessibility checker solutions. It is always likely that one solution identifies an error that another solution might miss entirely.
Whenever possible, it is a good idea to use both the accessibility checker built into the native application of your document (e.g., Microsoft Office Word, PPT, or Adobe Acrobat). The more information you have to correct any issues you might have the better. For more information on how to use the accessibility checkers in Word, PPT, and/or Adobe Acrobat, see Creating Accessible Documents.
Additional Resources
Please review the resources below for more guidance on how Ally assists faculty and students with making Blackboard instructional content more accessible and usable:
-
- Faculty
- ITS Knowledgebase: Using Blackboard Ally @Mason (for Faculty) opens a new window
- Navigating Ally’s Instructor Feedback [PDF] opens a new window
- Understanding Ally’s Course Accessibility Report [PDF] opens a new window
- Blackboard Ally Course Accessibility Checklist [PDF] opens a new window
- Adding Headings to a Word document [PDF] opens a new window
- Add Headers to your Data Tables in Word [PDF] opens a new window
- PLEASE NOTE: Although this resource references Word. The same steps apply to PowerPoint presentations.
- Faculty
Still have questions?
If you have additional questions related to Blackboard accessibility, please contact the ATI.