
 Panorama is an accessibility tool that integrates seamlessly with the Canvas Learning Management System (LMS). It is designed to help institutions improve the accessibility of digital media and course content.
Overall, it creates a more engaging and user-friendly experience for instructors by helping them identify inaccessible digital media, and for students by enabling them to select the alternate formats (e.g., electronic braille, PDFs, audio/MP3) that best support their specific learning needs. For information on getting started with Panorama, see below:
-
- Panorama Basics
- Fixing Accessibility Issues using the Accessibility Report
- Access Alternate Format Options in Panorama (Students)
- Fixing PDFs Using Structural Remediation Max
- Manage your documents with Accessible DocHub (Non-Canvas Users)
- Adjust your browsing experience with Web Accessibility Widget
- Additional Resources (i.e., video demos, generating course reports, etc.)
Panorama Basics
Below is a short video overview for those who are new to Panorama (1:43)* and some brief tips/strategies to help you with learning what Panorama offers and how to access it in your Canvas course:
Panorama provides two major benefits:
- Panorama identifies inaccessible digital media in your course site (i.e., images, documents, videos without captions, etc.) in your Canvas course that need to be made accessible for students; especially those with disabilities who use assistive technologies (e.g., blind, low vision, and motor impairments) and those with learning/cognitive challenges (e.g., dyslexia).



- Panorama provides all students with the ability to download an alternative format (e.g., audio, electronic braille, web-based, etc.) of any document that you have uploaded in your course.
The RED OCTAGON, ORANGE TRIANGLE, or GREEN CIRCLE Accessibility score icons indicate how accessible your file is and the likelihood that it could pose a potential access issue for a student with a disability.

Accessibility score icons are located next to each file type or along the top of HTML content and provide a quick at-a-glance summary of the accessibility score based on their color.
-
- The blue circle is for student view.
- The green hexagon is for accessibility scores greater than 70%.
- The ORANGE triangle is for accessibility scores between 30% and 70%.
- The red octagon is for accessibility scores less than or equal to 30%.
- The grey prohibition sign is for documents with disabled alternative formats.
NOTE: RED and ORANGE icons mean that students with disabilities, especially those who use assistive technologies (e.g., blind/low vision, keyboard-only users) and/or those with learning/cognitive challenges (e.g., dyslexia), will find it difficult to access the content in those images and documents.
For more information, see Panorama Accessibility Score Indicators opens a new window.
Simply hover your mouse over the Accessibility score icon to access your score.

What happens if I click on the Accessibility score icon?
Panorama opens a Document Preview window, highlighting the following:
-
- Preview of the instructional content or document
- Overall accessibility score of the instructional content or document
- Number of critical issues
- List of the identified accessibility issues
- Access to alternative formats
- Access previous versions
- Fix this document (i.e., access options to quickly remediate the instructional content or document)

For more information, see Using the Accessibility Report for LMS Documents opens a new window.
To add the Panorama link to your course navigation in Canvas, do the following:
- Log in to Canvas and select Courses.
- Select Settings.
- Select Navigation.
- Locate Panorama in the list of items hidden from students.
- Drag it to the preferred location in your navigation menu.
- Click Save at the bottom of the page.

Fixing Accessibility Issues using the Accessibility Report
Getting Started
Start by clicking on the accessibility score icon next to the instructional content or document. Prioritize fixing documents with RED and ORANGE accessibility score icons. These icons indicate that the instructional content could pose an accessibility barrier for students.

This will open the Preview Window. Once opened, the Preview Window provides instructors with information on the following:
-
- Preview of the instructional content or document
- Overall accessibility score of the instructional content or document
- Number of critical issues
- List of the identified accessibility issues
- Access to alternative formats
- Access previous versions
- Fix this document (i.e., access options to quickly remediate the instructional content or document)
Reviewing and Correcting Issues
Begin by reviewing each issue individually. You can review all the issues at once or filter them by clicking on the Minor, Major, or Severe tabs.

Click the issue to highlight it in the Document Preview window. This will make it easier to visually identify the problem.

To correct the issue, click on either the Fix Issue or Check Issue links. Fix Issue will show when the issue can be resolved directly in Panorama. For example, links without text descriptions, images without alternative text descriptions, and color contrast issues can be corrected directly within Panorama.

Check Issue shows when the issue can only be reviewed or verified, but cannot be corrected in the LMS. To fix these issues, the document must be corrected in its native application. For example, reading order issues on PowerPoint slides should be corrected within PowerPoint. Once corrected, you can replace the original file in the File Upload area.
Visit Yuja Panorama’s Help Center for additional resources.
Getting Help
Not sure what to do? After clicking the Fix Issue link, select the ‘Help Guide’ link for information on resolving that specific accessibility issue. Instructors will then receive guidance on the importance of addressing the issue, view a short video on how to correct it, and receive step-by-step instructions. (PLEASE NOTE: When clicking Check Issue, select the ‘Learn More’ link.)


Additionally, instructors can contact the ATI Office by email at [email protected] or by phone at 703-993-4329 for guidance.
Alternative Format Options in Canvas (Students)
Panorama offers students multiple alternative format options to support various learning styles and needs. View the video below to learn more:
To access alternative formats, start by clicking on the Alternative Formats icon.
When the Alternative Formats menu opens, select from the following options:

- Source File: View the document in its original format, suitable for download viewing.
- PDF: View the document in PDF format, suitable for both online and download viewing.
- Text File: View the document in a pure text format without any formatting styles, suitable for both online and download viewing.
- Immersive Reader: Allows for customizations to text preferences, grammar options, and reading preferences while following along with the audio playback.
- Gradient Reader: Enhances visual word recognition when reading by providing a guiding color gradient.
- EPUB: View the document in the e-book format, suitable for any e-book reader application.
- Braille: View the document in the braille grade 2 format, suitable for download viewing (a braille reader is required).
- Audio Podcast: Audio playback for documents, suitable for both online and download listening.
- Enhanced HTML: HTML documents can be displayed in a dedicated tab to customize the document’s appearance using the Website Accessibility tool.
- OCR: Convert images with text into machine-encoded text that can be searched and read by screen readers.
- Math Formats: Convert documents containing math equations into LaTeX, Math Text (i.e., numbers and symbols to words), MP3 files, or MathML.
For more detail regarding the alternate formats available and what would work best for you, visit Alternative Formats in Panorama opens a new window.
Fixing PDFs using Structural Remediation Max
Panorama’s Structural Remediation Max tool helps instructors make structural changes to PDF documents directly in Canvas, such as adding headings, adjusting reading order, applying optical character recognition (OCR) to scanned files, and generating alternative text descriptions for images. The goal is to make PDFs more accessible and easier to read for students using assistive technology, including screen readers and text-to-speech tools. The video below provides an overview of the tool:
Before spending time remediating a PDF, ask yourself the following questions:
-
- Is this document actively being used in the course?
- Is it required course content?
- Is there an accessible Word or PowerPoint version available?
In many cases, replacement is more effective than remediation. Consider replacing a problematic PDF with:
-
- A Canvas page
- An accessible Word document
- An accessible PowerPoint file
- Publisher-provided accessible content
If the original Word or PowerPoint source file is available, fixing the source and exporting a new PDF is usually faster and yields better accessibility outcomes than remediating the PDF directly.
Begin by identifying which PDFs in your course need attention:
-
- Select the PDF document you want to improve, prioritizing those flagged with RED or ORANGE accessibility scores. These flags indicate content that may pose barriers for students.
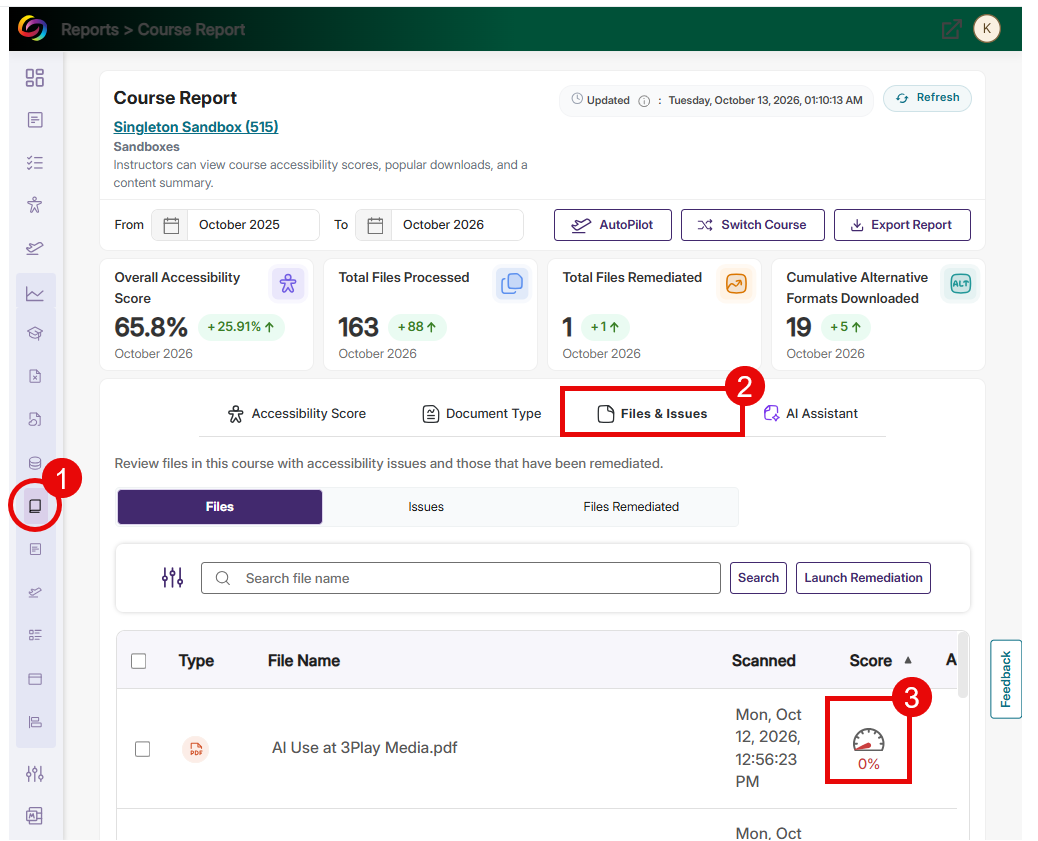
- Click on the accessibility score icon to open the document preview window. This can be accessed through the navigation menu, Panorama > Course Report > Files & Issues tab (see image below), or by navigating to the file’s location in DocHub or your Canvas course (e.g., Modules, Files).
If a PDF is a scanned image rather than a digitally created document, assistive technologies cannot properly read its content. Signs that OCR may be needed:
-
- You cannot highlight or search for text within the PDF
- Panorama identifies image-based PDFs as Scanned or Untagged.
- Alternative formats generated from the PDF appear incomplete or garbled
Start by running OCR on Untagged or Scanned PDFs.
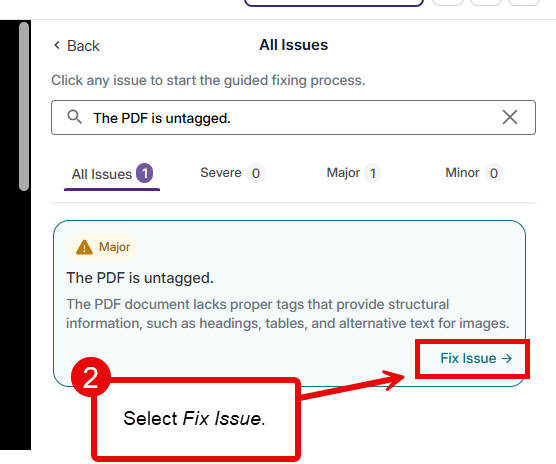


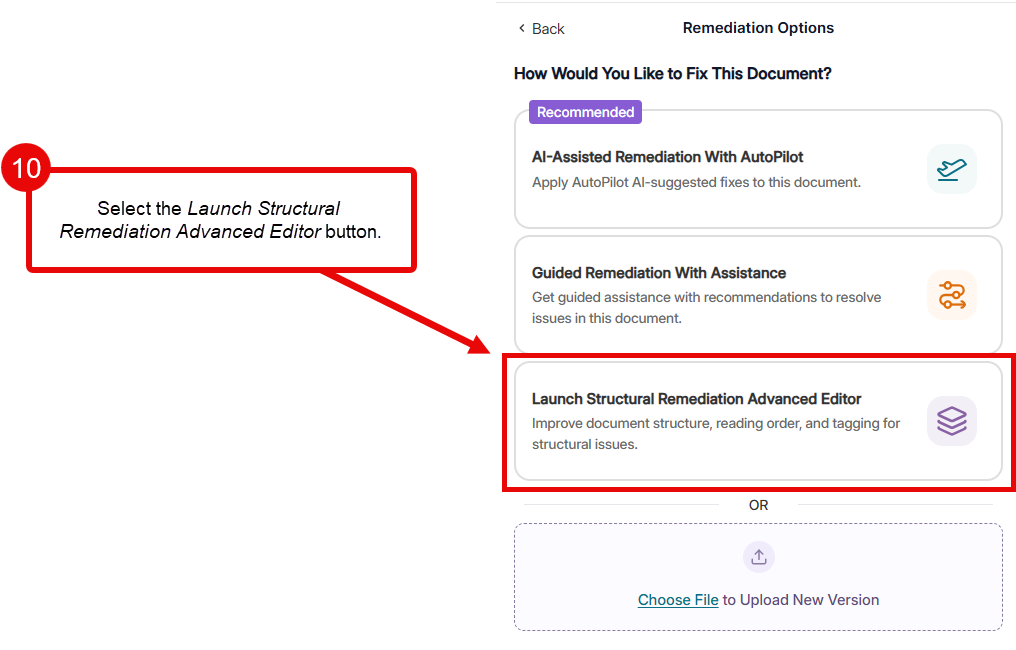
 After OCR completes, note the change in the document’s accessibility score. Remediate the remaining issues one by one, or select the Fix This Document button. This will provide access to the Structural Remediation Advanced Editor tool, where you can verify the accuracy of the OCR tagging process, add alt text for images in bulk, and/or retag the document, if necessary.
PLEASE NOTE: If your document is incorrectly tagged during the OCR process, restart the process by clicking the vertical ellipsis (3 vertical dots) button on the top right of the document preview window and restoring the original version. Once restored, restart the tagging process by selecting the other OCR option (i.e., OCR Overlaid vs OCR Reconstructed). This addresses most issues. If this does not solve your problem, proceed to Step 7.
Once OCR has been applied (if needed), run the Structural Remediation Advanced Editor tool to verify the document’s structure and reading order. Proper structure allows students to navigate headings, move through sections, understand lists, and access image and table content using assistive technology.
Select the Elements tab to review the automatically identified and tagged headings, paragraphs, lists, tables, figures, and reading order. Edit and move tags within the tags tree as needed to correct misidentified elements or the reading order.
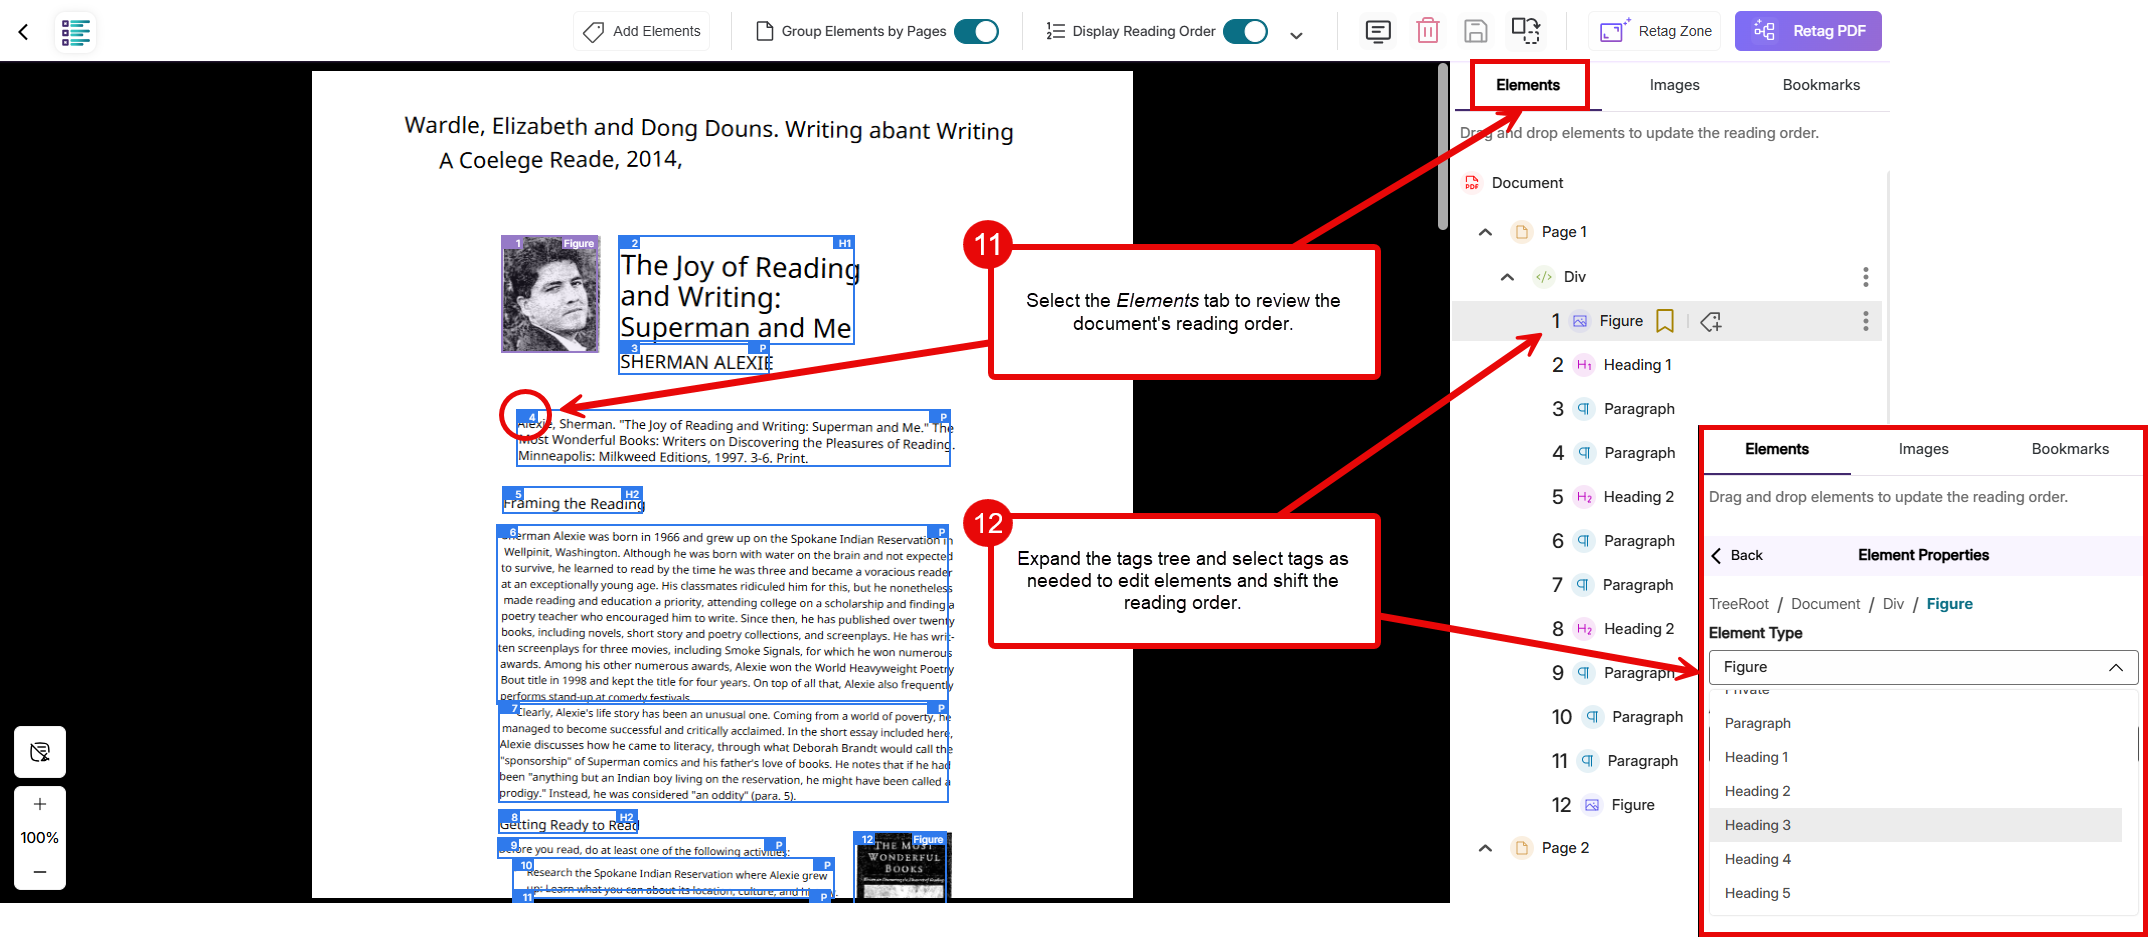
Pay close attention to the following:
-
- Headings: Verify that major sections (e.g., chapter titles, learning objectives, discussion questions) are tagged as headings, not as regular paragraphs. Under the Elements tab, promote or demote heading levels as needed to reflect the document’s hierarchy.
- Lists: Check that bulleted lists, numbered lists, and step-by-step instructions are tagged as lists rather than as individual paragraphs. Screen readers recognize lists and identify the number of items when they are properly labeled (e.g., “List with 5 items”). This provides essential navigation information that students relying on assistive technology depend on.
- Tables: Verify that tables are recognized as tables, that header rows are properly identified, and that data appears in the correct cells. If a table contains merged cells, multiple header levels, or complex data relationships, consider escalating to the ATI rather than attempting manual corrections.
PLEASE NOTE: If your document is incorrectly tagged during the OCR process, restart the process by clicking the Retag PDF button on the top right of the document preview window. Disable the Skip Text Recognition (OCR) option and repeat the OCR process. This addresses most retagging issues. If this does not solve your problem, proceed to Step 7.
Students who are blind or have low vision cannot access image content without alternative text (alt text) descriptions. Under the Images tab, select the Bulk Fix Alt Text button, and allow Panorama to generate AI-powered descriptions for every image in the document.
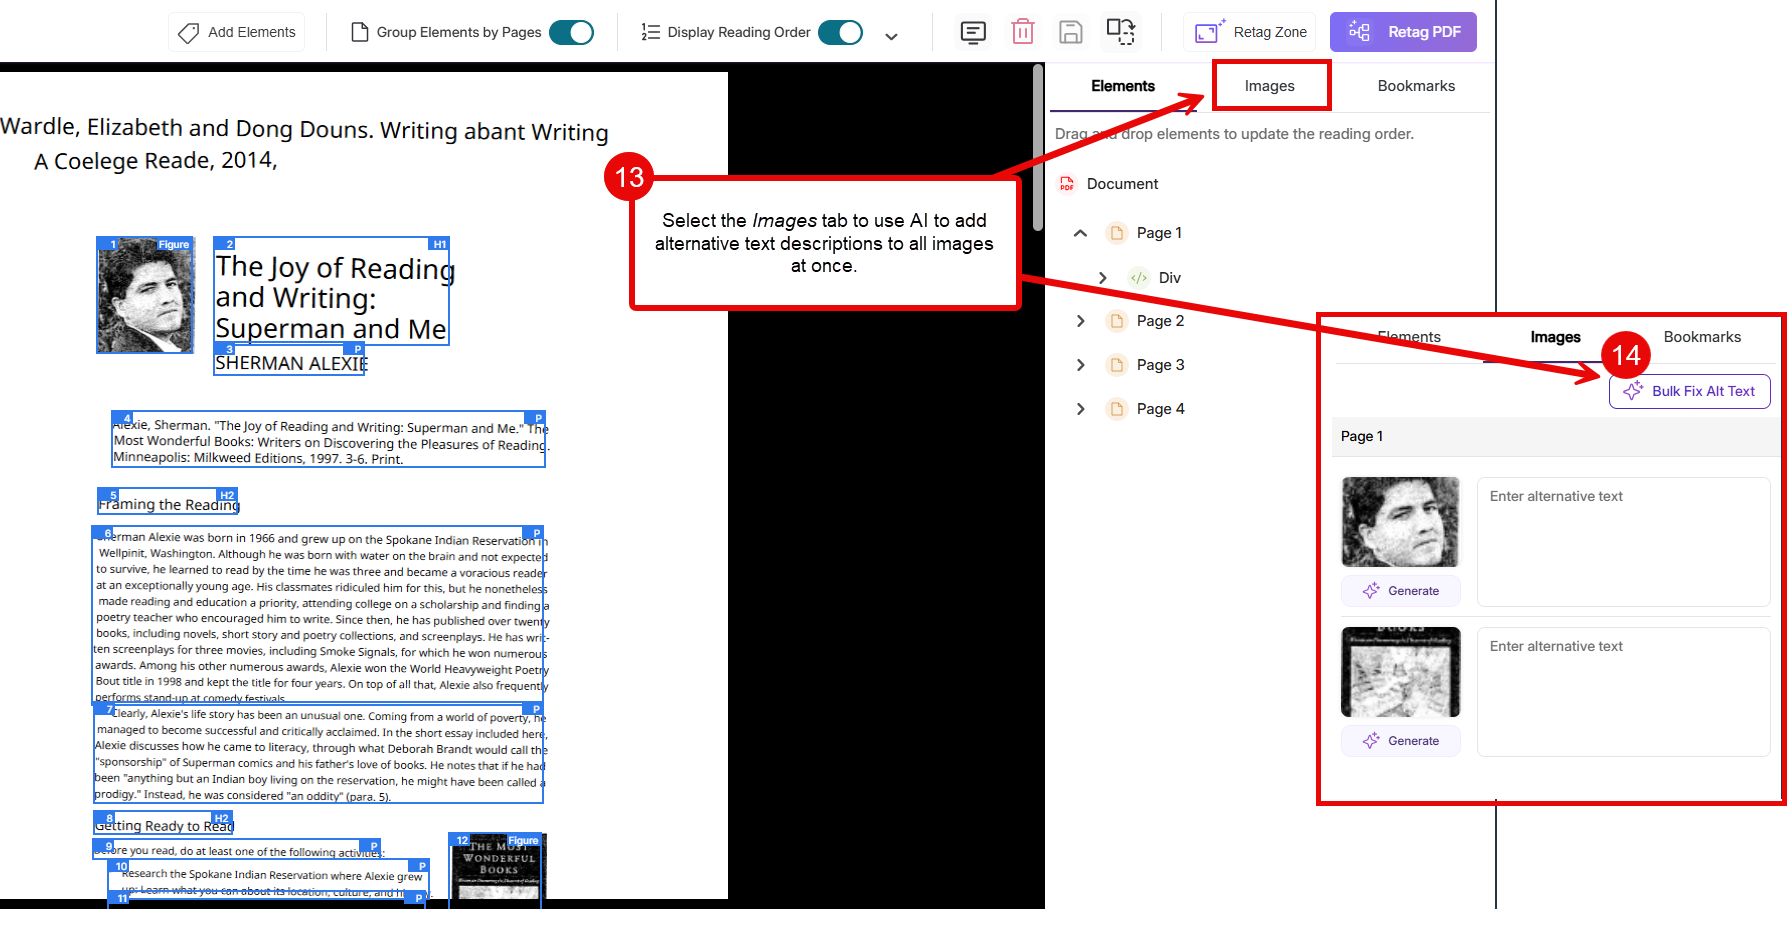
Review every AI-generated description before accepting it:
-
- Accept descriptions that are accurate and meaningful (e.g., “Bar chart showing student enrollment increasing from 2021 to 2025”).
- Revise descriptions that are too vague (e.g., change “Graph” to “Bar chart comparing undergraduate and graduate enrollment by year, with graduate enrollment declining after 2023”).
- Mark as Decorative any images that are purely visual and carry no informational content (e.g., borders, background graphics, decorative icons, repeated logos).
PLEASE NOTE: Do not accept AI-generated alt text without review. For charts and graphs, aim to describe what the user should take away from the image, not just how it looks.
A document can have proper tags and still be unusable if the reading order is wrong. Reading order issues are among the most common sources of PDF accessibility complaints. Review the reading order by following the elements in the document window or the list to the right of the document window.
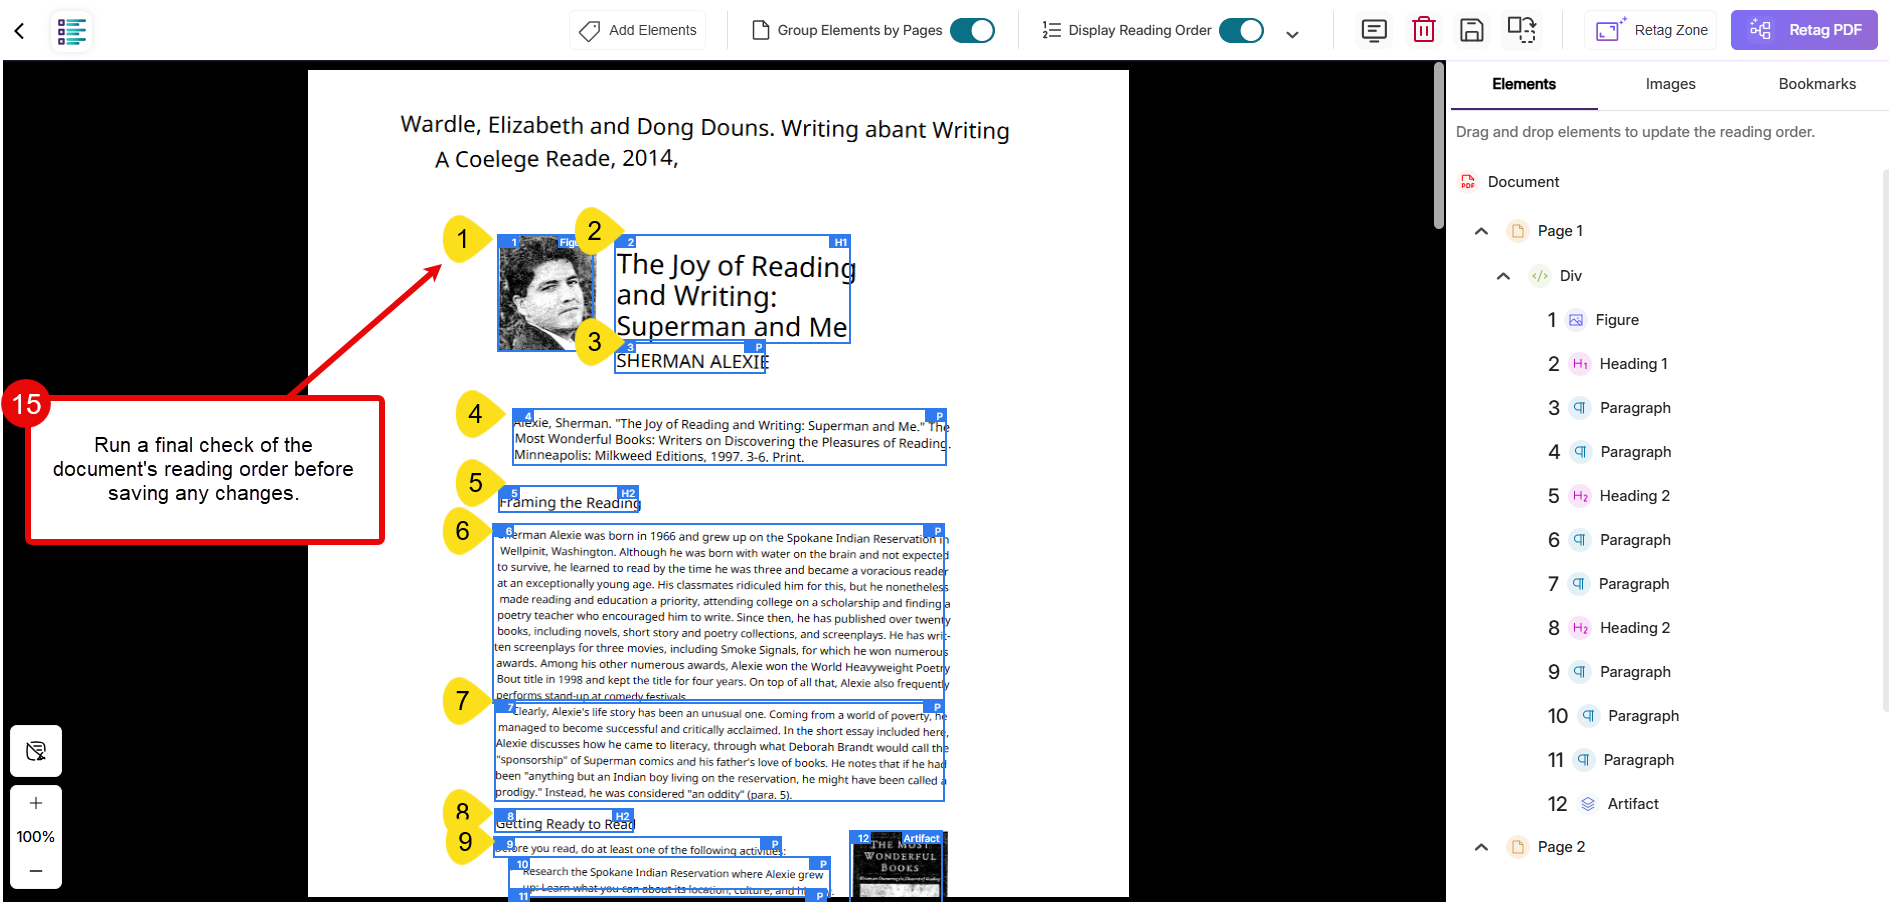
Ask yourself: Does the content read logically for a student listening aloud using a screen reader or text-to-speech application?
Common reading order problems to look for include:
-
- Multi-column documents: Screen readers may mix content across columns rather than reading one column at a time.
- Sidebars: Sidebar content may be read aloud before the main body text, interrupting the document flow.
- Captions: Image captions may become detached from the images they describe.
- Callout boxes: Important notes or instructions may appear out of sequence relative to the surrounding content.
Adjust content order as needed so that assistive technologies encounter information in a logical, meaningful sequence.
Before finalizing your remediation, ask yourself whether a student using assistive technology would be able to:
-
- Search the document for specific terms?
- Navigate between headings and sections?
- Understand images through their alt text descriptions?
- Access table information in a meaningful order?
- Follow the reading order from start to finish?
- Have the content read aloud coherently by text-to-speech?
If yes, the PDF likely meets the goals of first-level remediation and is ready for students. Follow the steps below to save the changes and see the document’s updated accessibility score:
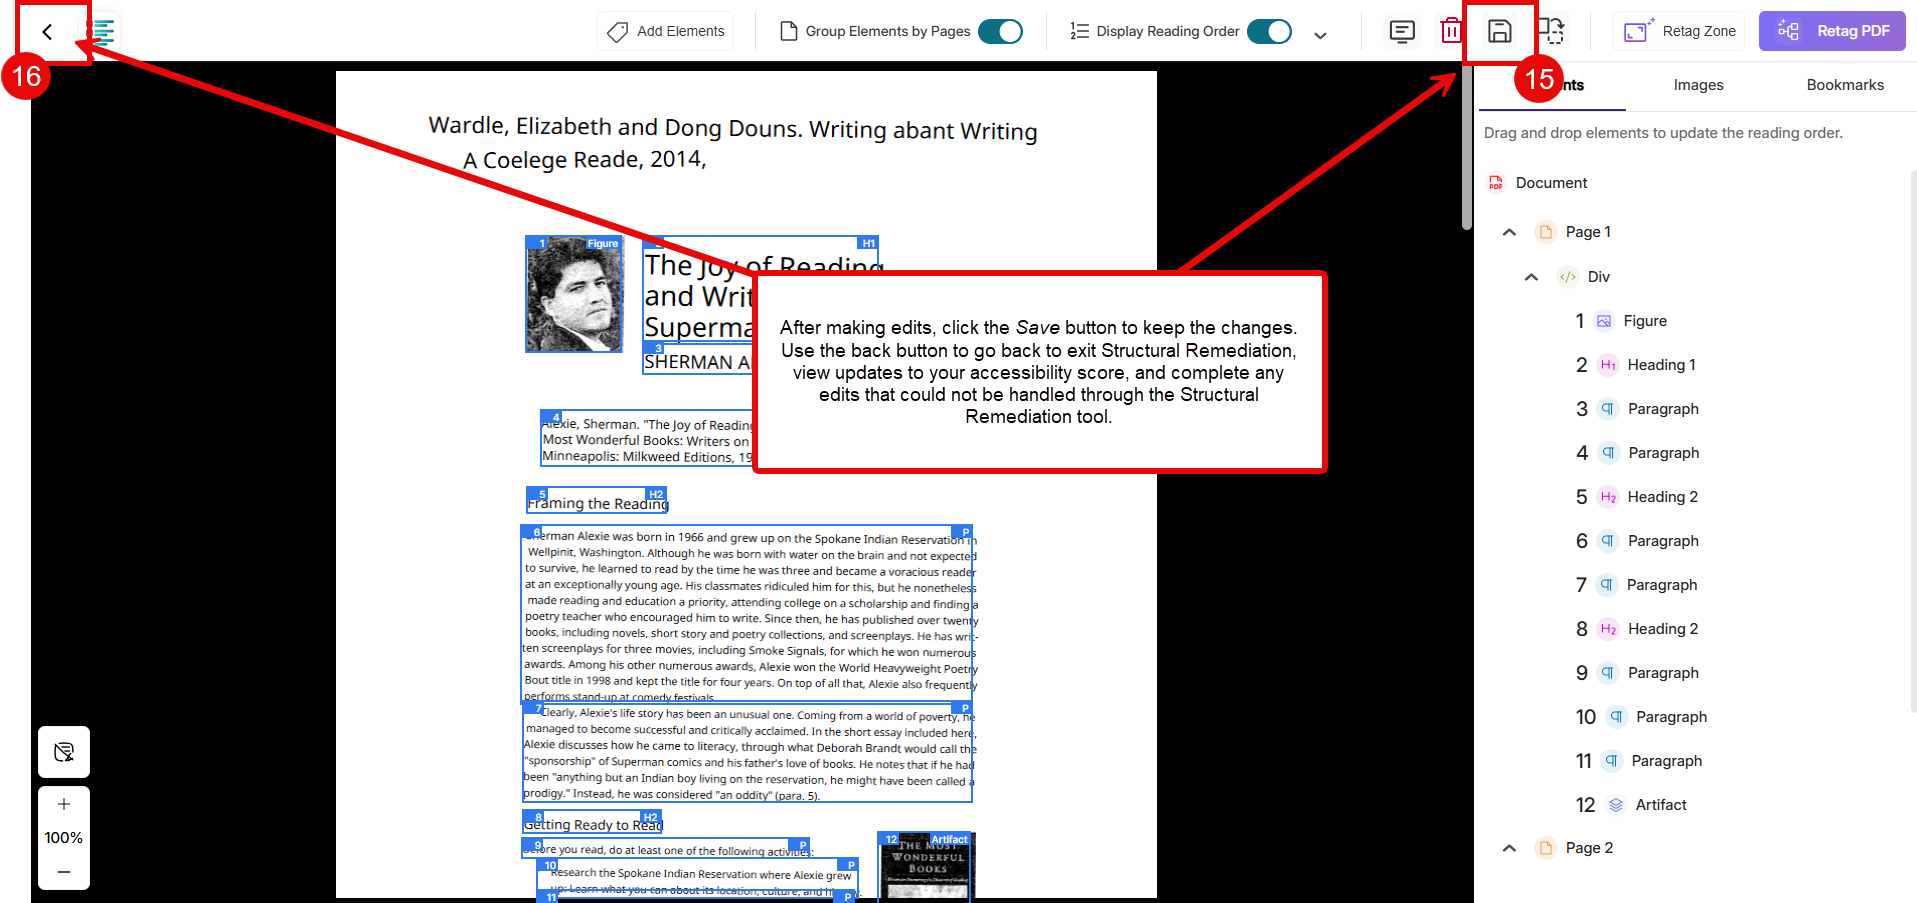 PLEASE NOTE: Additional remediations (e.g., document title, fixing unclear hyperlink text) may be required after exiting the Structural Remediation Advanced Editor tool.
Contact the ATI Office for additional support when a PDF contains any of the following:
-
- Math and STEM content — equations, chemistry or statistics notation, or graph-heavy material (OCR and structural tagging rarely produce accessible math without specialized review)
- Complex tables — multiple header rows, merged cells, or financial/data-intensive reports
- Fillable forms — interactive PDFs, applications, or surveys
- Handwritten materials — instructor notes, historical documents, or annotated scans
- Multi-column publications — journal articles, newsletters, or brochures with complex layouts
- Poor OCR results — text that remains inaccurate after OCR has been applied
The ATI Office can be reached by email at [email protected] or by phone at 703-993-4329.
PDF Remediation Video Demos Using Structural Remediation
Below are a few example videos using the steps above to demonstrate how to remediate PDFs using the Structural Remediation Advanced Editor tool in Panorama:
Additional PDF Remediation Resources
Below are a few of the most common PDF accessibility issues flagged by Panorama. Select the link for additional guidance on resolving each issue:
For additional information, visit PDF Remediation Max in Panorama opens a new window.
Accessible DocHub
Panorama’s Accessible DocHub tool is a platform for accessible document storage that allows users to upload and store files in the Panorama Cloud. Panorama automatically checks the accessibility of files stored in the Accessible DocHub. Users can also share files via email and synchronize their accessible content across multiple devices. The video (2:31) below provides additional information:
How do I access DocHub?
- To access the Accessible DocHub, go to https://gmu.panorama.yuja.com. Click Log In Using SSO Authentication.

- Once logged in, users may be taken to the Course Accessibility Report screen. If that happens, access the menu on the left-hand side of the screen and click DocHub.

- All users are provided with 4 preset folders. You may use this or simply delete them by accessing the vertical ellipsis to the right of the folder name. Users can also create their own folders.

For additional information, visit The DocHub Page The DocHub Page in Panorama opens a new window.
Web Accessibility Widget
Panorama’s Website Accessibility Widget allows students to adjust the content and color of course site web pages to meet their respective learning styles. Users can take advantage of predefined user profiles like ADHD which enables screen masking to reduce distraction and Dyslexia which enables the use of special fonts to support users with print impairments. The video (1:13) below provides additional information:
How do add the Web Accessibility Widget?
To access the Web Accessibility Widget, click on Panorama in your Course Menu and then click on General Settings. Next, scroll down to the Default Course Settings section and enable LMS Website Accessibility.

Click the gear icon to the right of the LMS Website Accessibility to adjust where the icon is placed by default.

Once enabled, you will see the Web Accessibility Icon on your Canvas course site (PLEASE NOTE: Once turned on, this widget can be accessed in any Canvas course). Click the icon to open the Website Accessibility dashboard and adjust your color and contrast settings.
 For additional information, visit Panorama’s Website Accessibility Widget opens a new window.
Additional Resources
Please review the resources below for more guidance on how Ally assists faculty and students with making Blackboard instructional content more accessible and usable:
-
- Panorama’s Voluntary Product Accessibility Templates (VPAT)
Video Demos
The following playlist, Basic Canvas Accessibility Videos (by Tonya Howe in the Costello College of Business), features short videos that offer guidance on remediating course content in Canvas using Panorama:
Generating Course, Program, and College/School Reports in Panorama
- VIDEO: Accessing Reports for Courses, Programs, and Colleges/Schools opens a new window
- Reference Guide: Accessing Reports for Courses, Programs, and Colleges/Schools [PDF] opens a new window
Yuja Panorama Help Center Resources
-
- Yuja Panorama Help Center opens a new window
- What Does Panorama Flag as an Accessibility Issue? opens a new window
- Accessing the Panorama Alternative Formats Menu opens a new window
- Getting Started with Panorama for Instructors opens a new window
- Adding an Alternative Text Description to an Image in Canvas opens a new window
Still have questions?
If you have additional questions related to Panorama’s Digital Accessibility Platform, please contact the ATI.